Running Simulations with the Simulation API
Introduction to the Simulation API
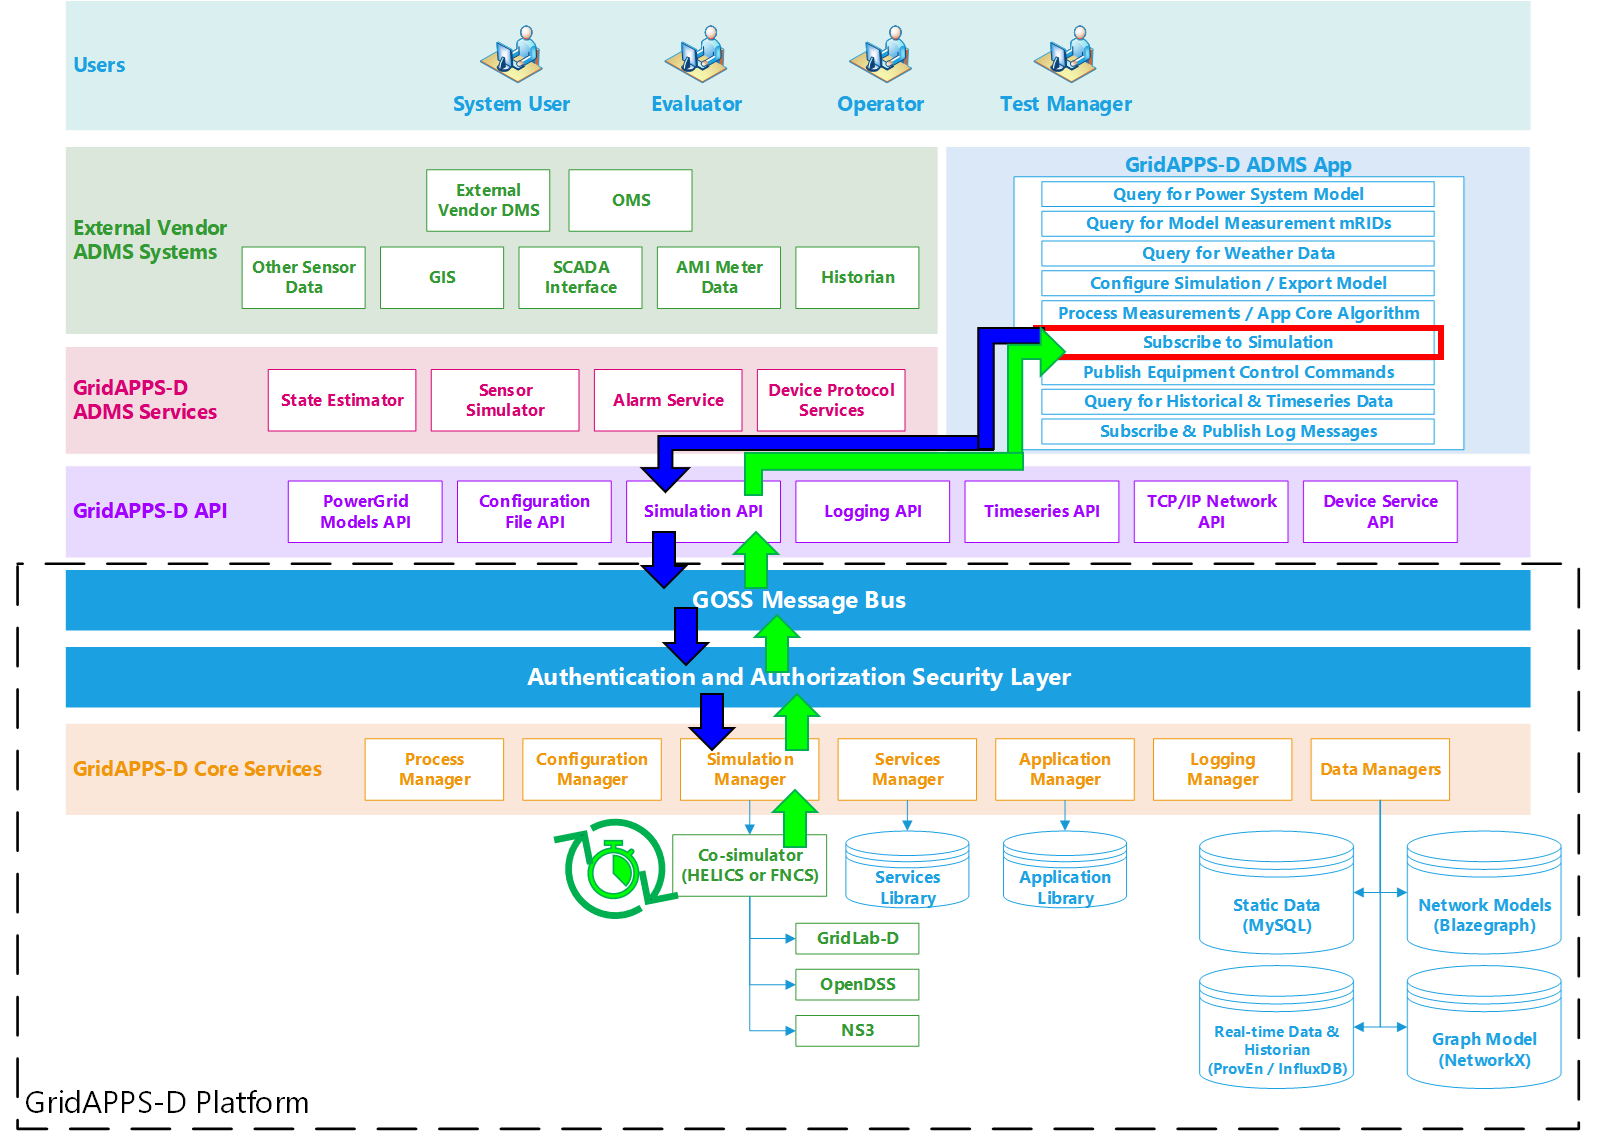
The Simulation API is used for all actions related to a power system simulation. It is used to start, pause, restart, and stop a simulation from the command line or inside an application. It is all used to subscribe to measurements of equipment (such as line flows, loads, and DG setpoints) and the statuses of switches, capacitors, transformer taps, etc. It is also used to publish equipment control and other simulation input commands.
In the Application Components diagram (explained in detail with sample code in GridAPPS-D Application Structure), the PowerGrid Models API is used for controlling the simulation, subscribing to measurement data, and controlling equipment.
This section covers only the portion of the API used for starting, stopping, and pausing simulations. Equipment control commands are covered in Controlling Simulation with the Simulation API
API Syntax Overview
Application passes subscription request to GridAPPS-D Platform
The subscription request is perfromed by passing the app core algorithm function / class definition to the gapps.subscribe method. The application then passes the subscription request through the Simulation API to the topic channel for the particular simulation on the GOSS Message Bus. If the application is authorized to access simulation output, the subscription request is delivered to the Simulation Manager.
GridAPPS-D Platform delivers published simulation output to Application
Unlike the previous queries made to the various databases, the GridAPPS-D Platform does not provide any immediate response back to the application. Instead, the Simulation Manager will start delivering measurement data back to the application through the Simulation API at each subsequent timestep until the simulation ends or the application unsubscribes. The measurement data is then passed to the core algorithm class / function, where it is processed and used to run the app’s optimization / control algorithms.
API Communication Channel
The Simulation API is used to communicate with a broad range of subscribers through both static /queue/ (the type of channel used for passing databse queries) and dynamic /topic/ communication channel names.
Extreme care is needed to use the correct communication channel. For a review of GridAPPS-D topics, see API Communication Channels
The correct communication channel for each Simulation API call will be provided in the corresponding section for each API task below.
Structure of a Simulation Message
Due to the wide range of tasks accomplished by the Simualtion API, there is no single message format that is used across all API Calls.
Each message takes the form of a python dictionary or equivalent JSON script wrapped as a python string.
The structure of each Simulation API call message will be provided in the corresponding section for each API task below.
Simulation Start Message
This section explains the API call used to start simulations. For most application developers, typical use cases would be either
starting a digital twin simulation from within an app for “what-if” analysis
building an automated test script that would launch a simulation with exactly identical parameters each time.
The API message structure and start command are also used by the GridAPPS-D Viz when starting a simulation using the steps in Creating a Simulation with GridAPPS-D Viz. However, the API call and detail simulation start message are hidden from the user when using Viz.
GridAPPS-D Communication Channel
This is a static /queue/ communication channel used to quest the simulation to start. The base static string used is goss.gridappsd.process.request.simulation, which can be called using the .REQUEST_SIMULATION method from the topics library.
When developing in python, it is recommended to use the .REQUEST_SIMULATION method. When using the STOMP client in GridAPPS-D VIZ, it is necessary to use the base static string.
[ ]:
from gridappsd import topics as t
topic = t.REQUEST_SIMULATION
Structure of a Start Message
To start a simulation from the command line or from inside an application, it is necessary to pass a message with a structure similar to that used by the Configuration File API) so that the GridAPPS-D platform can create a custom GridLab-D file from the CIM XML model stored in the Blazegraph Database.
The accepted set of key-value pairs for the Simulation API call to start a new simulation is
message = {
    "power_system_config": {
        "key1": "value1",
        "key2": "value2"},
    "simulation_config": {
        "key1": "value1",
        "key2": "value2",
        "model_creation_config": {
            "key1": "value1",
            "key2": "value2",
            "model_state": {
                "key1": "value1",
                "key2": "value2"}
            }
         },
    "simulation_output": {
        "key1": "value1",
        "key2": "value2"},
    "application_config": [{
        "key1": "value1",
        "key2": "value2"}],
    "test_config": {
        "events": [{,
            "message": {
                "forward_differences": [{
                    "key1": "value1",
                    "key2": "value2"}]
                "reverse_differences": [{
                    "key1": "value1",
                    "key2": "value2"}],
            "key1": "value1",
            "key2": "value2"}
            }]
    },
    "service_configs": {
        "key1": "value1",
        "key2": "value2"}
}
The components of the message are identical to the options in the tabs in the GridAPPS-D. Each key-value pair is explained in detail below.
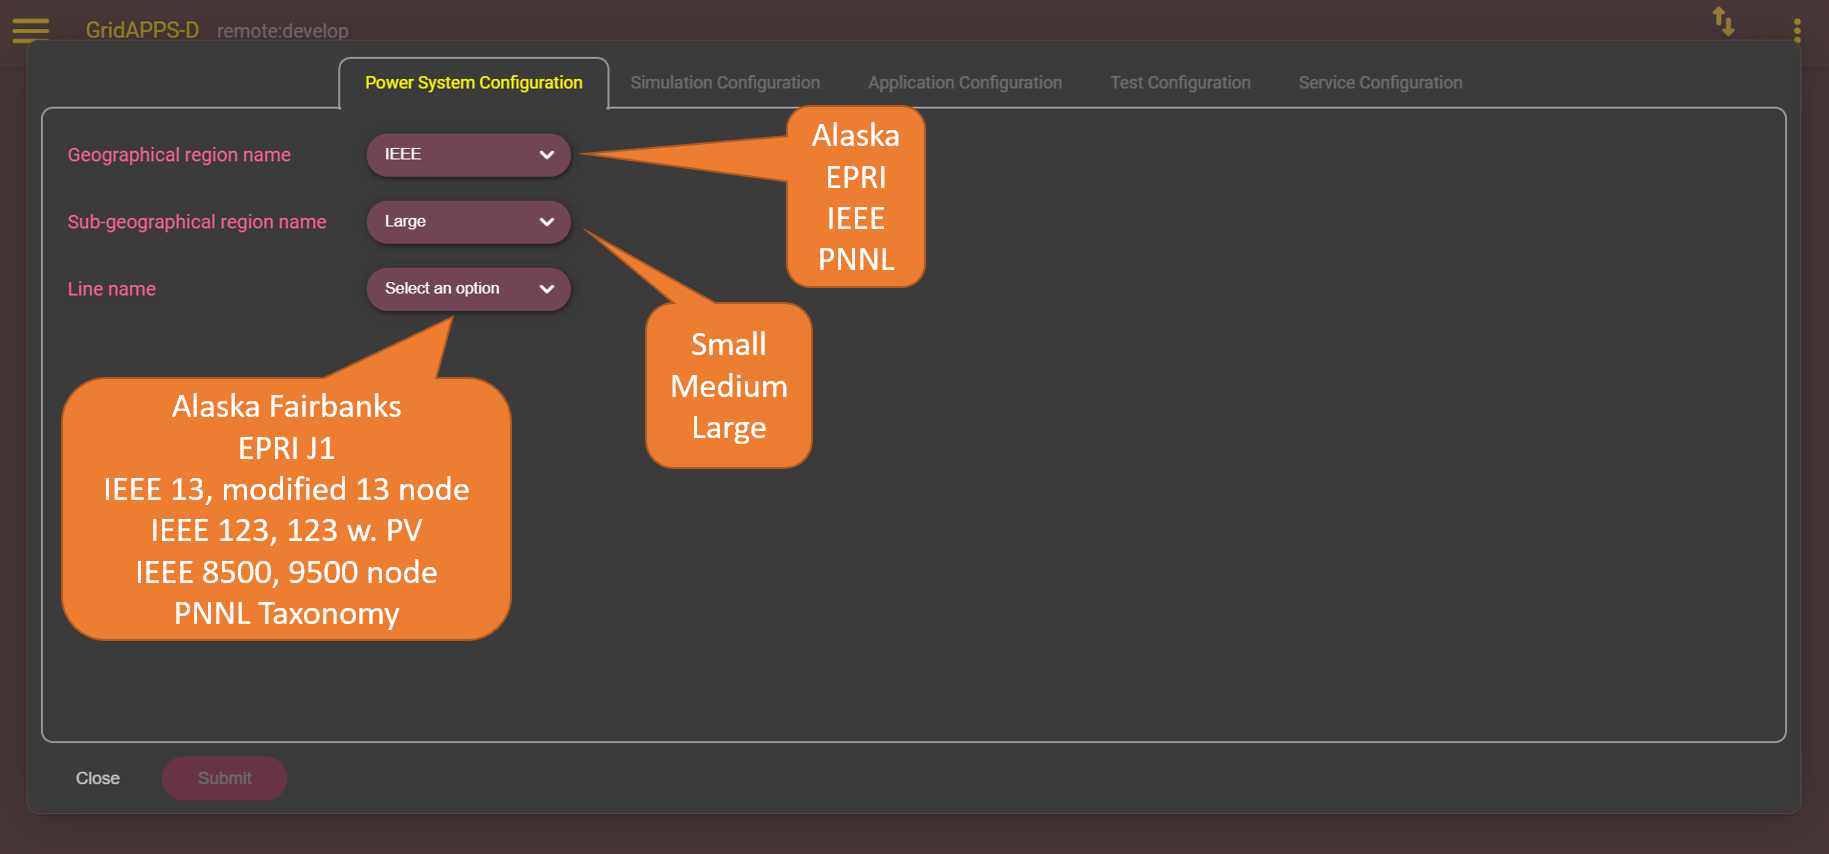
Power System Configuration
The "power_system_config": key is required and specifies the CIM XML model to be imported and used for the simulation. Required key-value pairs are
"power_system_config": {   REQUIRED KEY                      REQUIRED VALUE
                     "GeographicalRegion_name":           mRID as string ,
                     "SubGeographicalRegion_name":        mRID as string ,
                     "Line_name":                         mRID as string }
As can be seen, the required key-value pairs are identical to those that are selected graphically using the GridAPPS-D Viz:
Simulation Configuration
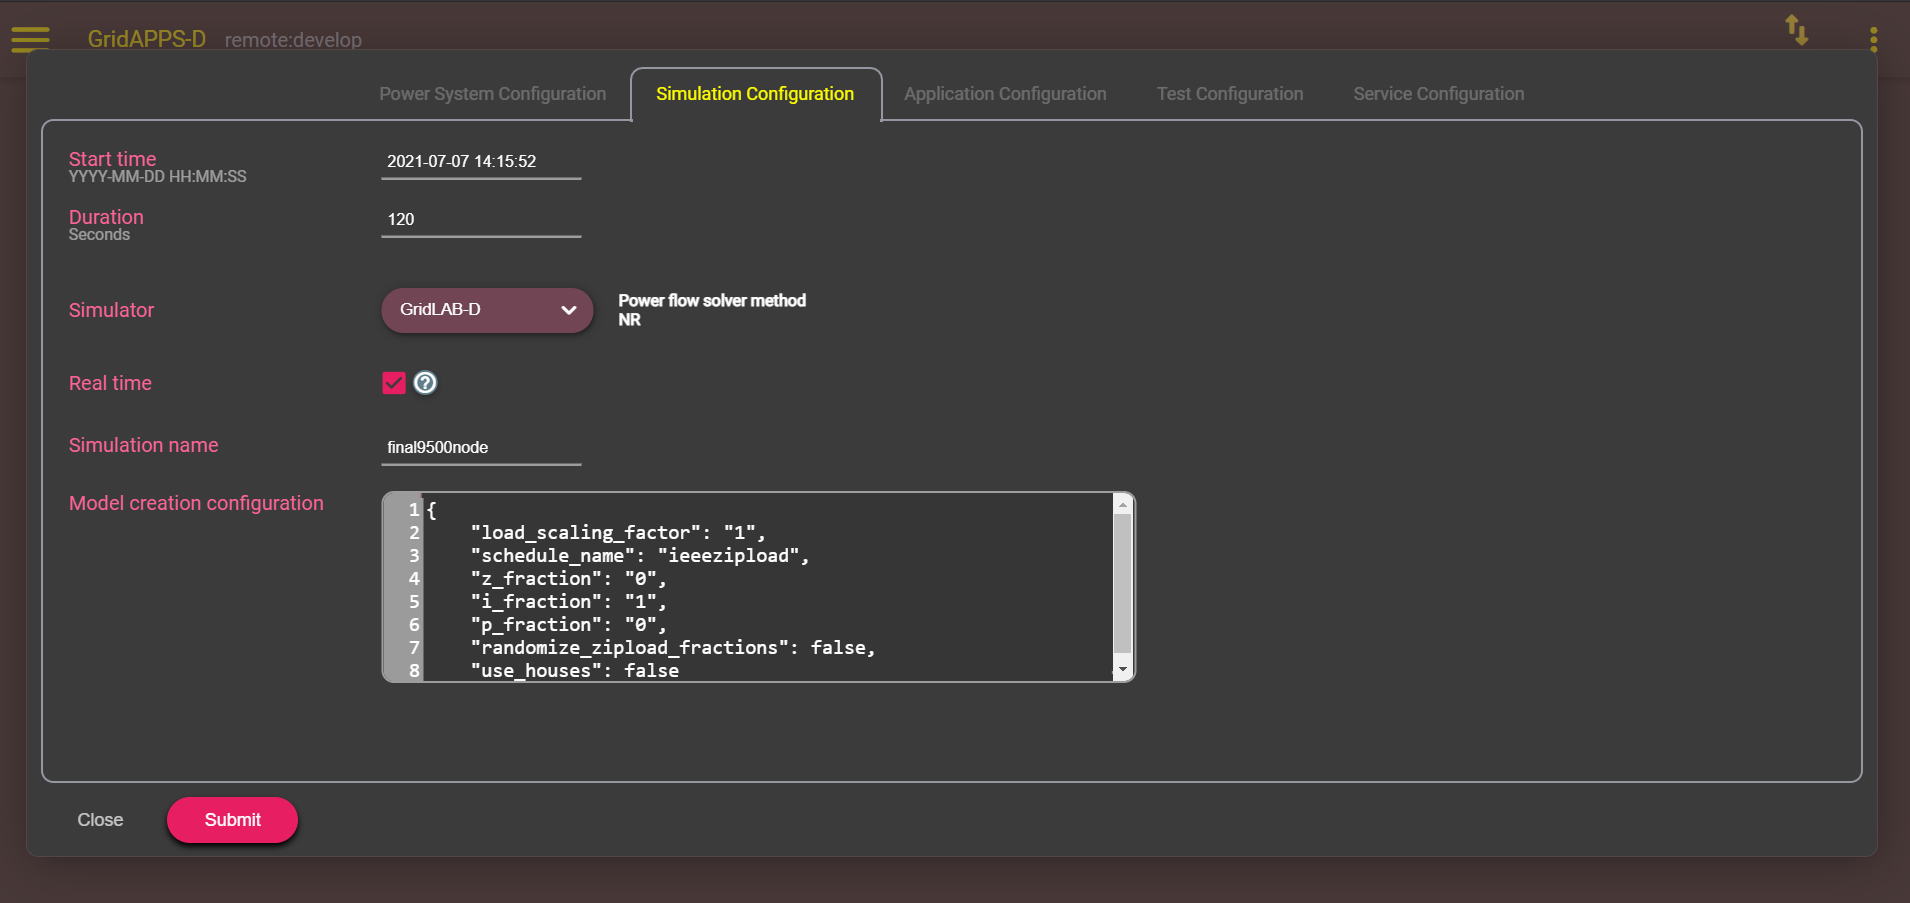
The "simulation_config": key is required and specifies the runtime parameters, such as simulation duration and time step. Required key-value pairs are
"simulation_config": {   REQUIRED KEY                      REQUIRED VALUE
                    "start_time":                    epoch time string ,
                    "duration":                      number (seconds) ,
                    "simulator":                     "GridLAB-D" ,
                    "timestep_frequency":            number (milliseconds) ,
                    "timestep_increment":            number (milliseconds) ,
                    "run_realtime":                  true OR false ,
                    "simulation_name":               string ,
                    "power_flow_solver_method":      "NR" ,
                    "model_creation_config":         key-value pairs }
The key "model_creation_config": is one of the optional key-value pairs that can specified. This specifies the load profile and changes to the base case used for the simulation. Key-value pairs are
"model_creation_config": { KEY                       VALUE
                    "load_scaling_factor":             number ,
                    "schedule_name":                   string ,
                    "z_fraction":                      number ,
                    "i_fraction":                      number ,
                    "p_fraction":                      number ,
                    "randomize_zipload_fractions":     true OR false ,
                    "use_houses":                      true OR false ,
                    "model_state":                     key-value pairs }
The key "model_state:" is one of the optional key-value pairs used to specify changes to switch positions and DER setpoints from the base case stored in the Blazegraph database. Key-value pairs are
"model_state": {
                "synchronousmachines":[
                        {"name": "GLM/DSS name","p": number,"q": number},
                        {"name": "GLM/DSS name","p": number,"q": number}],
                "switches":[
                        {"name":"GLM/DSS name", "open": true},
                        {"name":"GLM/DSS name", "open": false}]
    }
As can be seen, the required key-value pairs are identical to those that are selected graphically using the GridAPPS-D Viz. By default, only the required key-value pairs are listed in the viz. The simulation launched in the Viz can be configured using any of the "model_creation_config" and "model_state" key-value pairs.
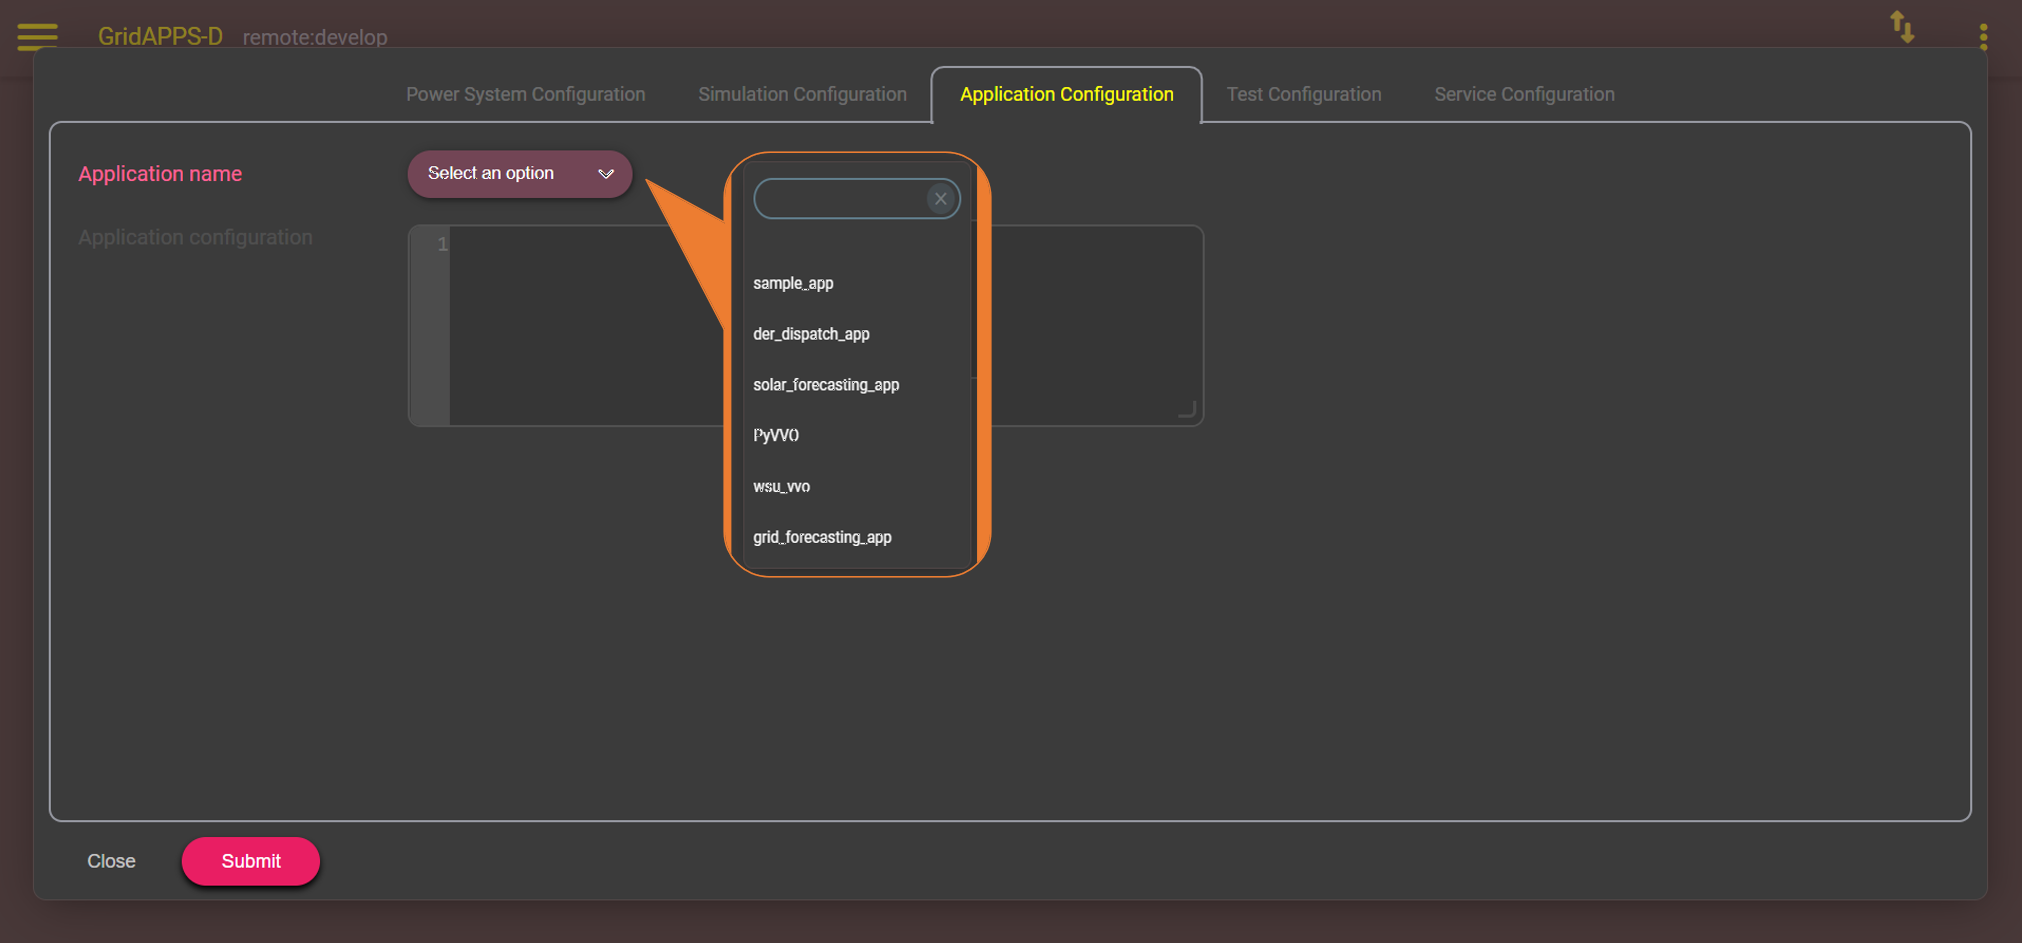
Application Configuration
The "application_config": key is optional and specifies which applications will run during the simulation. The associated value is a list that specifies the name and application-specific configuration parameters.
"application_config": {
        "applications": [
                {
                "name": "application1",
                "config_string": "application-specific config string"
                },
                {
                "name": "application2",
                "config_string": "application-specific config string"
                }]
}
As can be seen, the required key-value pairs are identical to those that are selected graphically using the GridAPPS-D Viz. Note: simulations started using the GridAPPS-D Viz can only run one app at a time. This is due to the GUI design and not a limitation of the Simulation API.
Test Manager Configuration
The TestManager is used to create realistic operational events during the simulation run, including faults, communication outages, and other unexpected equipment actions. These types of events can be used to test robustness of applications in variable conditions similar to those of the real world.
There are three types events supported by the TestManager and the GridAPPS-D Platform:
CIM defined fault events, used when a line is down or for taking a piece of equipment out of service.
Communication outage events which simulates measurements or control message outages.
Scheduled command at specific time which sends commands to a piece of equipment.
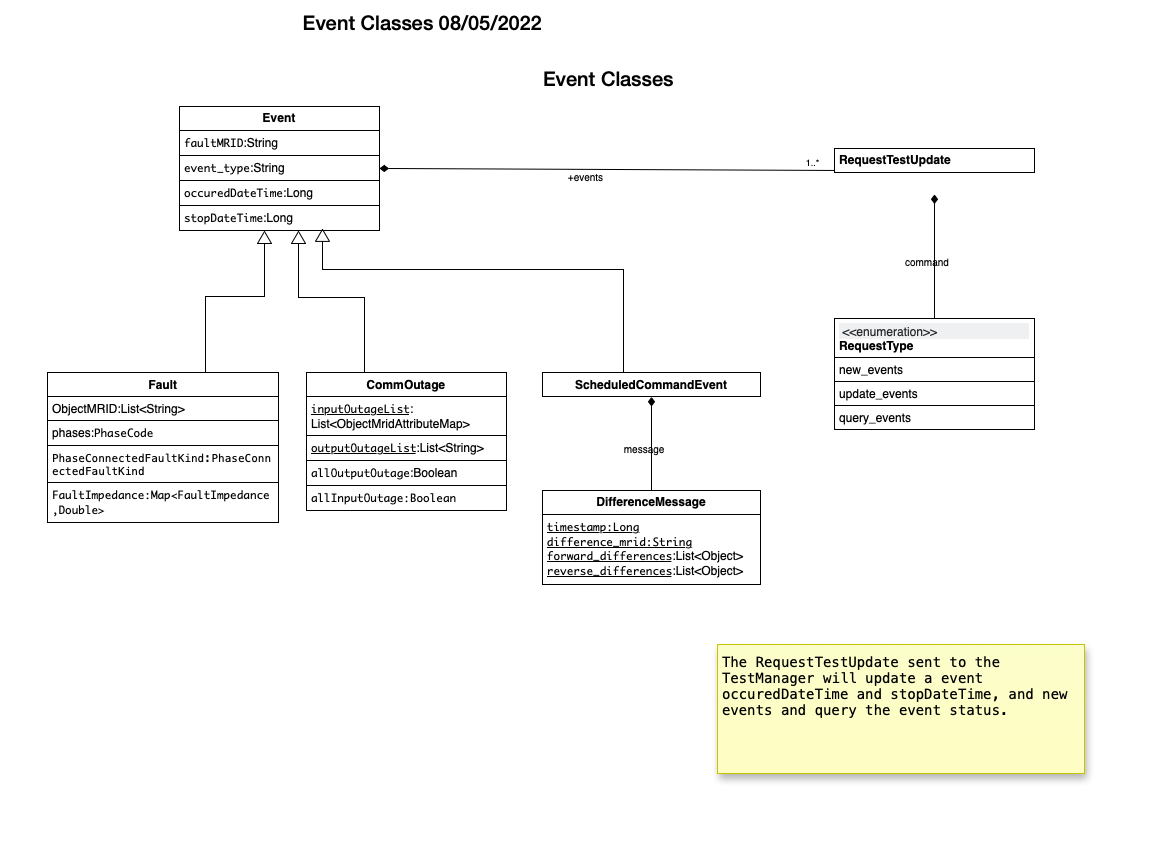
When starting a simulation, any combination of event categories can be specified using the "test_config": key-value pair structure. This key is optional and specifies whether any pre-scripted events should be scheduled to occur during the simulation, such as faults, communication outages, and equipment malfunctions.
The TestManager configuration can be written within the text of the Simulation API call or imported from a JSON file. Each of the event categories are discussed in further detail below.
"test_config": {
    "events": [
        {
            "event_type": "CommOutage",
            "tag": "unique_tag",
            "startDateTime": "YYYY-MM-DD HH:MM:SS" OR epoch time number,
            "stopDateTime": "YYY-MM-DD HH:MM:SS" OR epoch time number,
            "allInputOutage": true or false,
            "inputList": [
                {
                    "name": "equipment name",
                    "type": "CIM equipment type",
                    "mRID": "equipment object mRID",
                    "phases": [
                        {
                            "phaseLabel": "A" or "B" or "C",
                            "phaseIndex": number
                        }
                    ],
                    "attribute": "CIM Control Attribute"
                }
            ],
            "allOutputOutage": true or false,
            "outputList": [
                {
                    "name": "equipment name",
                    "type": "CIM equipment type",
                    "mRID": "equipment object mRID",
                    "phases": [ "A" or "B" or "C"  ],
                    "measurementTypes": [ "PNV" or "VA" or "POS" ]
                }
            ]
        },
        {
            "event_type": "Fault",
            "tag": "unique_tag",
            "equipmentType": "CIM object type",
            "equipmentName": "equipment name",
            "mRID": [
                "equipment object mRID",
                "equipment object mRID",
                "equipment objhect mRID"
            ],
            "phases": [
                {
                    "phaseLabel": "A" or "B" or "C",
                    "phaseIndex": number
                }
            ],
            "faultKind": "lineToGround" or "lineToLine" or "lineToLineToGround",
            "faultImpedance": {
                "rGround": "value",
                "xGround": "value"
            },
            "startDateTime": "YYYY-MM-DD HH:MM:SS" OR epoch time number,
            "stopDateTime": "YYYY-MM-DD HH:MM:SS" OR epoch time number
        },
        {
            "message": {
                "forward_differences": [
                    {
                        "object": "control object mRID",
                        "attribute": "CIM Class Attribute",
                        "value": number
                    }
                ],
                "reverse_differences": [
                    {
                        "object": "control object mRID",
                        "attribute": "CIM Class Attribute",
                        "value": number
                    }
                ]
            },
            "event_type": "ScheduledCommandEvent",
            "occuredDateTime": "YYYY-MM-DD HH:MM:SS" OR epoch time number,
            "stopDateTime": "YYYY-MM-DD HH:MM:SS" OR epoch time number
        }
    ]
}
Fault Events
Fault Events are defined in a Test Script and define the CIM Fault events that will be intialized and cleared at scheduled times.
The phases string is all the combinations of the 3-phases plus neutral and secondary phases. Some examples are :
“A”
“AN” would be line to line.
“AB” would be line to line.
“S12N” both hot wires to ground
“S12” both hot wires together.
PhaseConnectedFaultKind is an enumeration with the following values:
lineToGround
lineToLine
lineToLineToGround
lineOpen
The key-value pairs for specifying a fault event are:
{
    "PhaseConnectedFaultKind": string,
    "FaultImpedance": {
        "rGround": float,
        "xGround": float,
        "rLineToLine":float,
        "xLineToLine":float },
    "ObjectMRID": [string],
    "phases": string,
    "event_type": string,
    "occuredDateTime": long,
    "stopDateTime": long
}
Example 1: Fault Event Example in test script
{
    "command": "new_events",
    "events" : [{
        "PhaseConnectedFaultKind": "lineToGround",
        "FaultImpedance": {
            "rGround": 0.001,
            "xGround": 0.001 },
        "ObjectMRID": ["_9EF94B67-7279-21F4-5CEE-B2724E3C3FE6"],
        "phases": "ABC",
        "event_type": "Fault",
        "occuredDateTime": 1248130809,
        "stopDateTime": 1248130816}
    ]
}
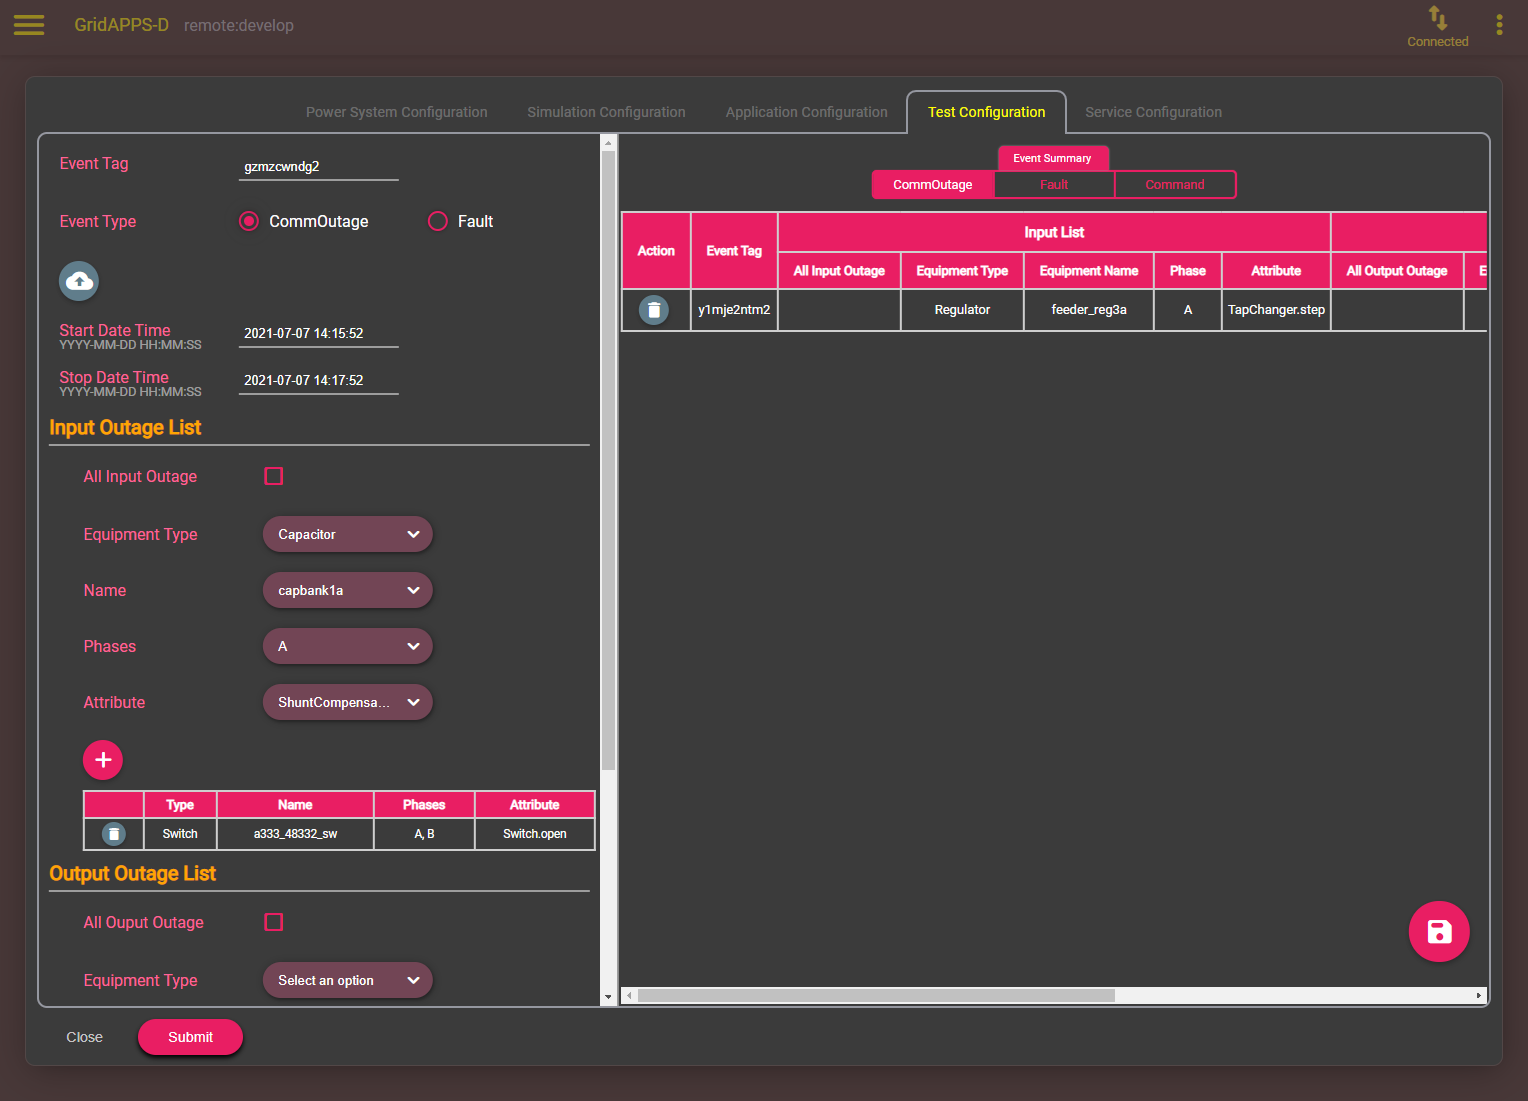
As can be seen, the required key-value pairs are identical to those that are selected graphically using the GridAPPS-D Viz. The Viz offers the equivalent options to create line faults, communications outages, or upload a custom difference message JSON file.
Example 2: Commands sent from the Test Manager to the simulation
{
    "command": "update",
    "input": {
        "timestamp": 1553201000414,
        "reverse_differences": [],
        "difference_mrid": "_ee4e4055-222f-4ccf-bed1-93063bd4392c",
        "forward_differences": [
        {
            "ObjectMRID": "12344",
            "FaultImpedance": {
                "xLineToLine": 0.0,
                "rGround": 0.001,
                "rLineToLine": 0.0,
                "xGround": 0.001
                },
            "FaultMRID": "1233",
            "PhaseCode": "AN",
            "PhaseConnectedFaultKind": "lineToGround"
            }
        ]
    }
}
Example 3: Clear a Fault Command example
{
    "command": "update",
    "input": {
        "timestamp": 1553201003561,
        "reverse_differences": [{
            "ObjectMRID": "12344",
            "FaultImpedance": {
                "xLineToLine": 0.0,
                "rGround": 0.001,
                "rLineToLine": 0.0,
                "xGround": 0.001
            },
            "FaultMRID": "1233",
            "PhaseCode": "AN",
            "PhaseConnectedFaultKind": "lineToGround"
        }
    ],
    "difference_mrid": "_00b4668d-8454-4f1c-aed9-42d1424af149",
    "forward_differences": []
    }
}
Communication Outage Events
Communication Outage events are separate from the CIM events but have occuredDateTime and stopDateTime.
The inputOutageList is the list of objectMRID and attribute pair. The objectMRID is anything that can be controllable and specific control attribute i.e. “RegulatingControl.mode”.
The outputOutageList is the list of MRIDs for the measurement device that is associated to the .
If allInputOutage is True the inputOutageList is not needed as all inputs to the simulator are blocked.
If allOutputOutage is True the outputOutageList is not needed as all outputs from the simulator are blocked.
The key-value pairs for communication outage events follow the format
{
    "allOutputOutage": boolean,
    "allInputOutage": boolean,
    "inputOutageList": [{"objectMRID":string, "attribute":string}],
    "outputOutageList": [string],
    "event_type": string,
    "occuredDateTime": long,
    "stopDateTime": long
}
Example 1: JSON Communication Outage command for the TestManager
{
    "command": "new_events",
    "events": [{
        "allOutputOutage": false,
        "allInputOutage": false,
        "inputOutageList": [{
            "objectMRID":"_EF2FF8C1-A6A6-4771-ADDD-A371AD929D5B",
            "attribute":"ShuntCompensator.sections" },
            {"objectMRID":"_C0F73227-012B-B70B-0142-55C7C991A343",
            "attribute":"ShuntCompensator.sections"}],
        "outputOutageList": ["_5405BE1A-BC86-5452-CBF2-BD1BA8984093"],
        "event_type": "CommOutage",
        "occuredDateTime": 1248130819,
        "stopDateTime": 1248130824
        }
    ]
}
As can be seen, the required key-value pairs are identical to those that are selected graphically using the GridAPPS-D Viz. The Viz offers the equivalent options to create line faults, communications outages, or upload a custom difference message JSON file.
Example 2: Communication Event to the Simulation Bridge
{
    "command": "CommOutage",
    "input": {
        "timestamp": 1248130819,
        "forward_differences": [
        {
            "allOutputOutage": false,
            "allInputOutage": false,
            "inputOutageList": [
            {
                "objectMRID": "_EF2FF8C1-A6A6-4771-ADDD-A371AD929D5B",
                "attribute": "ShuntCompensator.sections"
            },
            {
                "objectMRID": "_C0F73227-012B-B70B-0142-55C7C991A343",
                "attribute": "ShuntCompensator.sections"
            }
            ],
            "outputOutageList": [
            "_5405BE1A-BC86-5452-CBF2-BD1BA8984093"
            ],
            "faultMRID": "_ce5ee4c9-9c41-4f5e-8c5c-f19990f9cfba",
            "event_type": "CommOutage",
            "occuredDateTime": 1248130819,
            "stopDateTime": 1248130824
        }
        ],
        "reverse_differences": []
    }
}
Scheduled Command Events
Schedule Commands are events that can be scheduled for a specific point in time of the simulation. This can be used to trigger a fault like behavior, such as changing the taps of a regular or mimicking behavior of protective devices.
Faults in topologically meshed networks need to created using a Scheduled Command event to open all switches that would be tripped by protective relaying due to a known bug in the GridLAB-D logical fault processor.
The set of key-value pairs for Scheduled Command events follow the format below. The message parameters follow the format of a difference message, which is explained in detail in Format of Difference Messages.
{
    "command": "new_events",
    "events":[{
        "message":{
            "forward_differences": [{
                "object": "control object mRID",
                "attribute": "CIM Class Attribute",
                "value": number }],
            "reverse_differences": [{
                "object": "control object mRID",
                "attribute": "CIM Class Attribute",
                "value": number }]
            },
        },
        "occuredDateTime":long,
        "stopDateTime":long,
        }
    ]
}
Service Configuration
The "service_configs": key is used to start a GridAPPS-D service, such as the Sensor Service, State Estimator, or DNP3 Service. The key-value pairs for starting the service depend on the particular service and will be covered in the documentation for each GridAPPS-D Service. Note that the syntax of this key is a plural noun, unlike the other config keys.
Complete Simulation Start Message
The complete simulation message that is passed to the Simulation API is a Python dictionary / JSON string that specified the "power_system_conf":, "application_config":, "simulation_config":, "test_config":, and "service_configs": key-value pairs.
A sample simulation start message for the IEEE 123 bus system running the Sensor Simulator service and including one Scheduled Command event is shown below.
[ ]:
 run_config_123 = {
    "power_system_config": {
        "GeographicalRegion_name": "_73C512BD-7249-4F50-50DA-D93849B89C43",
        "SubGeographicalRegion_name": "_1CD7D2EE-3C91-3248-5662-A43EFEFAC224",
        "Line_name": "_C1C3E687-6FFD-C753-582B-632A27E28507"
    },
    "application_config": {
        "applications": []
    },
    "simulation_config": {
        "start_time": "1570041113",
        "duration": "120",
        "simulator": "GridLAB-D",
        "timestep_frequency": "1000",
        "timestep_increment": "1000",
        "run_realtime": True,
        "simulation_name": "ieee123",
        "power_flow_solver_method": "NR",
        "model_creation_config": {
            "load_scaling_factor": "1",
            "schedule_name": "ieeezipload",
            "z_fraction": "0",
            "i_fraction": "1",
            "p_fraction": "0",
            "randomize_zipload_fractions": False,
            "use_houses": False
        }
    },
    "test_config": {
        "events": [{
            "message": {
                "forward_differences": [
                    {
                        "object": "_6C1FDA90-1F4E-4716-BC90-1CCB59A6D5A9",
                        "attribute": "Switch.open",
                        "value": 1
                    }
                ],
                "reverse_differences": [
                    {
                        "object": "_6C1FDA90-1F4E-4716-BC90-1CCB59A6D5A9",
                        "attribute": "Switch.open",
                        "value": 0
                    }
                ]
            },
            "event_type": "ScheduledCommandEvent",
            "occuredDateTime": 1570041140,
            "stopDateTime": 1570041200
        }]
    },
     "service_configs": [{
        "id": "gridappsd-sensor-simulator",
        "user_options": {
            "sensors-config": {
                "_99db0dc7-ccda-4ed5-a772-a7db362e9818": {
                    "nominal-value": 100,
                    "perunit-confidence-band": 0.02,
                    "aggregation-interval": 5,
                    "perunit-drop-rate": 0.01
                },
                "_ee65ee31-a900-4f98-bf57-e752be924c4d": {},
                "_f2673c22-654b-452a-8297-45dae11b1e14": {}
            },
            "random-seed": 0,
            "default-aggregation-interval": 30,
            "passthrough-if-not-specified": False,
            "default-perunit-confidence-band": 0.01,
            "default-perunit-drop-rate": 0.05
        }
    }]
}
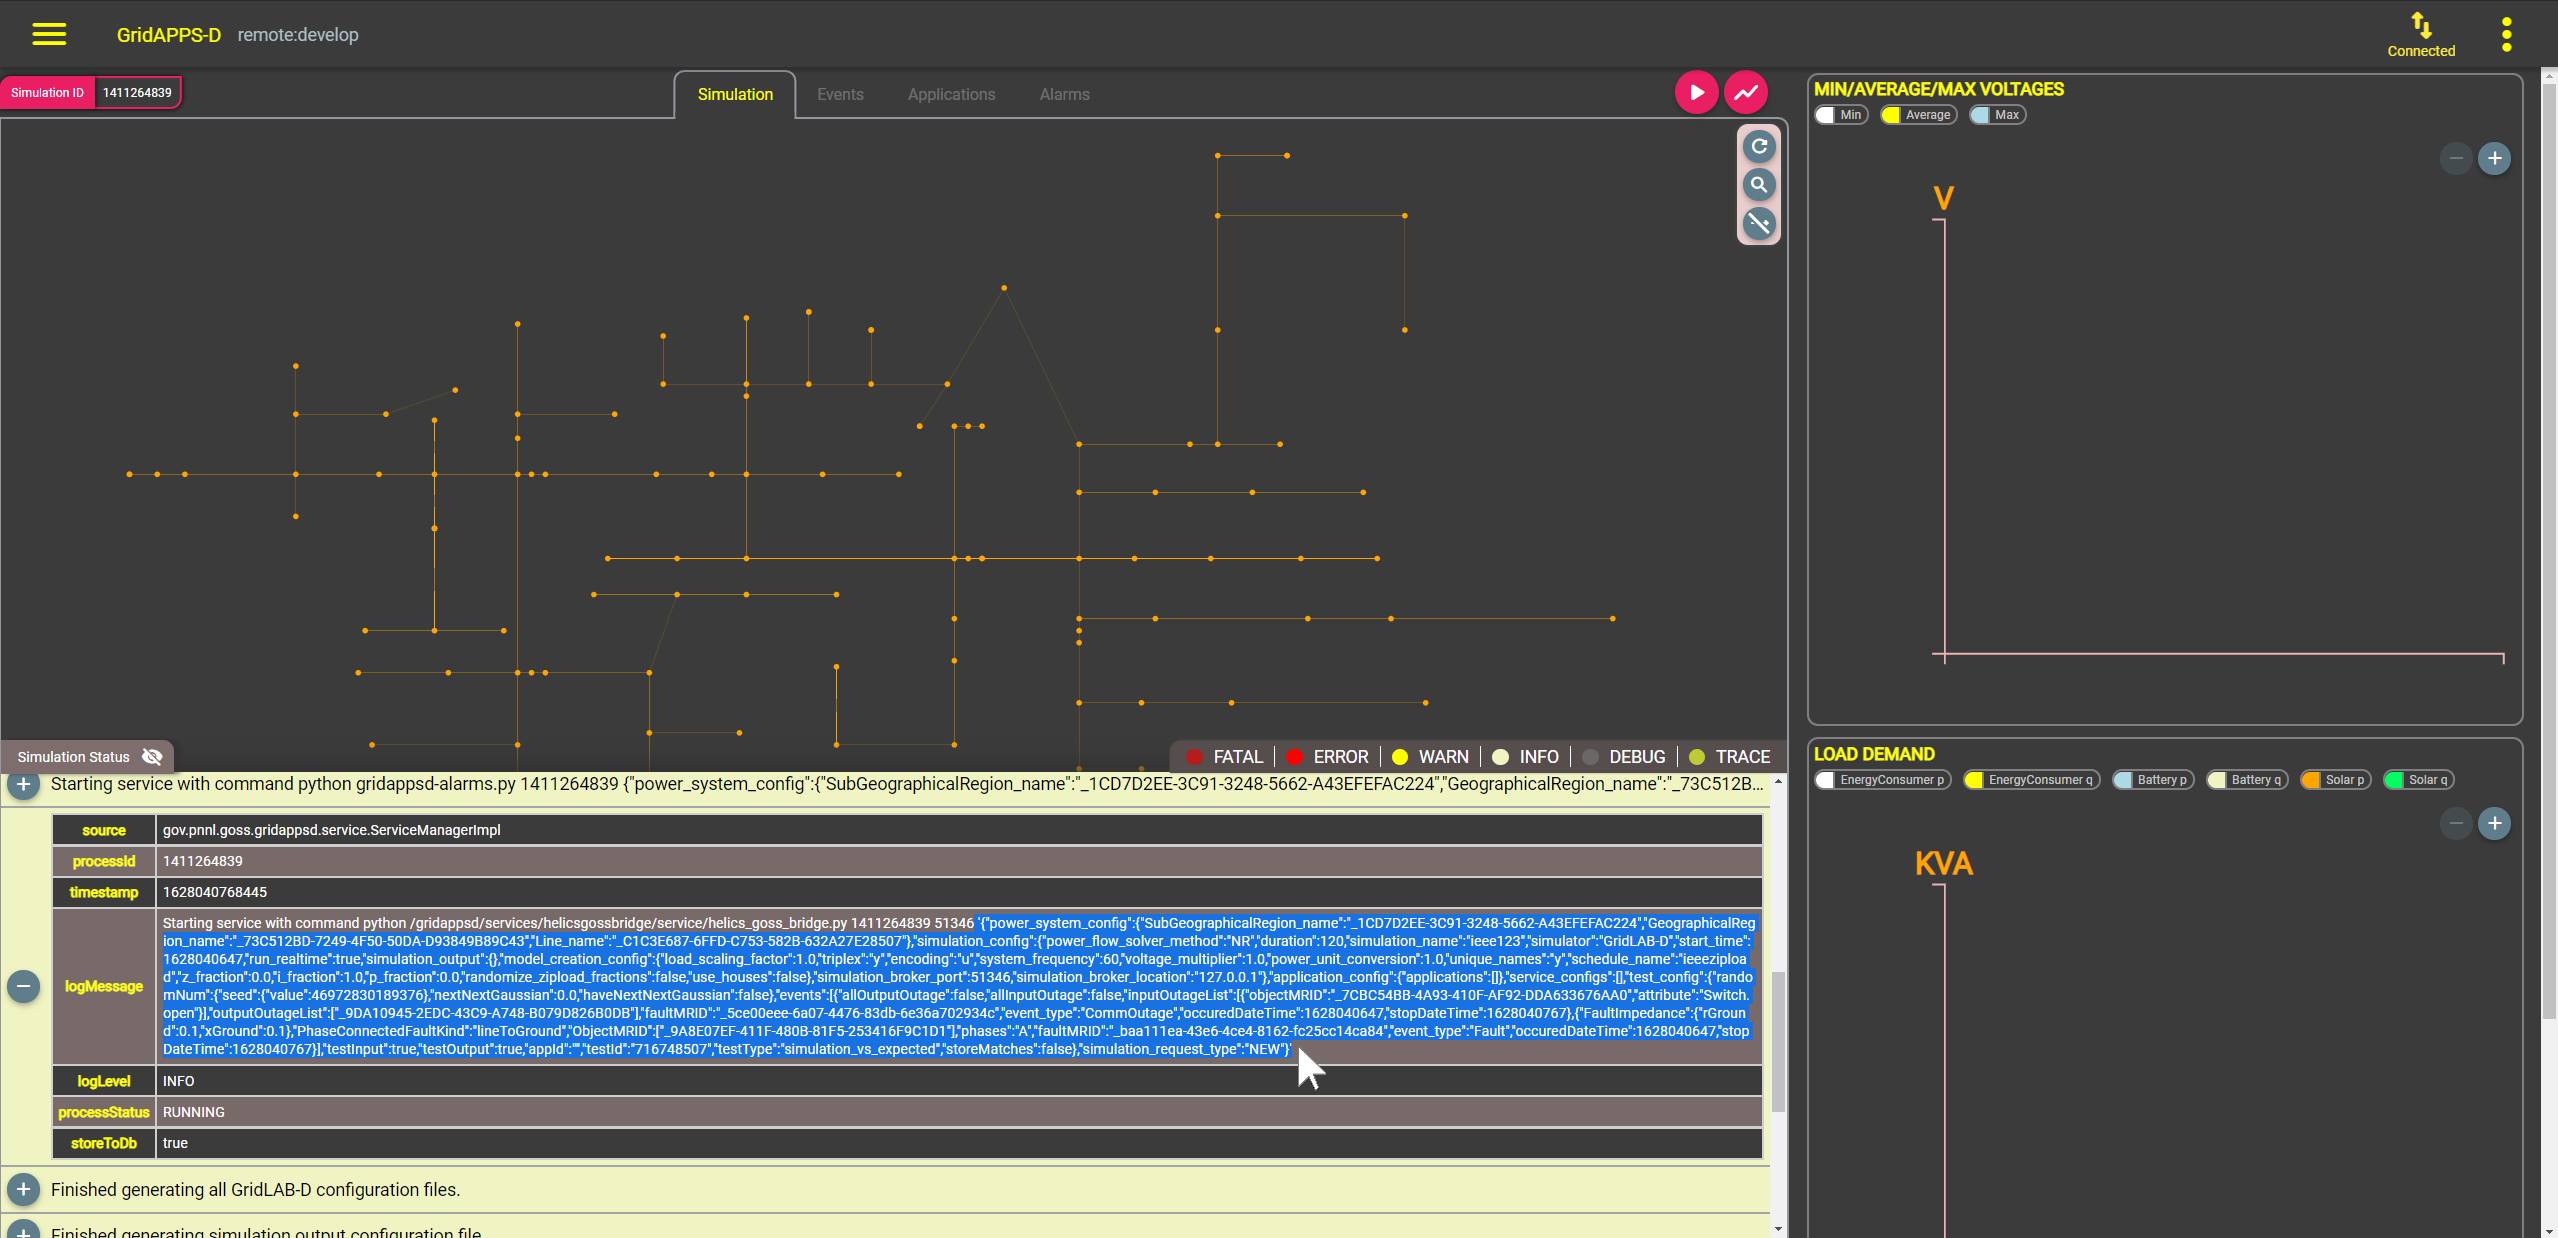
The simulation start message can be built from within the application or copied from the GridAPPS-D Viz by starting a new simulation and copying the start message from the log file. Pausing the simulation immediately after it starts is extremely helpful in locating the start message and copying it.
Starting the Simulation
To start the simulation, import the gridappsd.simulation library, which provides multiple shortcut functions for running and controlling a simulation.
The simulation start message python dictionary created in the previous section is then passed as an argument to Simulation object.
The .start_simulation() method is then used to pass the Simulation API call to the GOSS Message Bus and the GridAPPS-D Platform.
The simulation id can be obtained by invoking the .simulation_id method.
[ ]:
from gridappsd.simulation import Simulation # Import Simulation Library

simulation_obj = Simulation(gapps, run_config_123) # Create Simulation object
simulation_obj.start_simulation() # Start Simulation

simulation_id = simulation_obj.simulation_id # Obtain Simulation ID
print("Successfully started simulation with simulation_id: ", simulation_id)
The simulation start message can also be saved as a JSON file that is loaded using the json.load("filename.json") method. The simulation is then started by passing the start message to the .start_simulation() method.
[ ]:
import json
from gridappsd.simulation import Simulation # Import Simulation Library

run123_config = json.load(open("Run123NodeFileSimAPI.json")) # Pull simulation start message from saved file

simulation_obj = Simulation(gapps, run123_config) # Create Simulation object
simulation_obj.start_simulation() # Start Simulation

simulation_id = simulation_obj.simulation_id # Obtain Simulation ID
print("Successfully started simulation with simulation_id: ", simulation_id)
Pausing, Resuming, or Stopping a Simulation
Whether running a simulation through the GridAPPS-D Viz or a parallel digital twin simulation started from within your application, it is frequently useful to be able to pause, resume, or stop the simulation.
Using the gridappsd.simulation Python Library
For simulations that are started using the .start_simulation() method of the gridappsd.simulation python library, it is possible to use the associated methods to pause, resume, and stop simulations.
The library provides the following methods:
.pause()– Pause the simulation.resume()– Resume the simulation.resume_pause_at(pause_time)– Resume the simulation, and then pause it in so many seconds.stop()– Stop the simulation.run_loop()– Loop the entire simulation until interrupted
Using a Topic + Message API Call
If the simulation was started using the GridAPPS-D Viz, then pause, resume, and stop commands need to be issued using an API call to the Simulation API specifying the topic and message.
Specifying the Topic
This is a dynamic /topic/ communication channel that is best implemented by importing the GriAPPSD-Python library function for generating the correct topic.
[ ]:
viz_simulation_id = "paste sim_id here"
[ ]:
from gridappsd.topics import simulation_input_topic
topic = simulation_input_topic(viz_simulation_id)
Pause Message
The simulation can be paused using a very simple pause message. Since no response is expected from the Simulation API, we used the .send(topic, message) method for the GridAPPS-D connection object.
[ ]:
message = {"command": "pause"}
gapps.send(topic, message)
Resume Message
The simulation can be resumed using a very simple message. Since no response is expected from the Simulation API, we used the .send(topic, message) method for the GridAPPS-D connection object.
[ ]:
message = {"command": "resume"}
gapps.send(topic, message)
Resume then Pause Message
The simulation can be resumed and then paused using a very simple message. Since no response is expected from the Simulation API, we used the .send(topic, message) method for the GridAPPS-D connection object.
[ ]:
message = {
    "command": "resumePauseAt",
    "input": {"pauseIn": 10}
}
gapps.send(topic, message)
