Using the CIMantic Graphs API
This tutorial provides an introduction to usage of the CIMantic Graphs library (aka CIM-Graph).
CIMantic Graphs is an open-source library for creating in-memory labeled property graphs for creating, parsing, and editing CIM power system models. It creates Python object instances in memory using a data profile exported from a specified CIM profile (e.g. IEC61970cim17v40 or GridAPPS-D RC4_2021).
To install CIMantic Graphs clone the github repository or use pip install: pip install cim-graph
CIMantic Graphs Structure
CIMantic Graphs uses the layered architecture shown below:
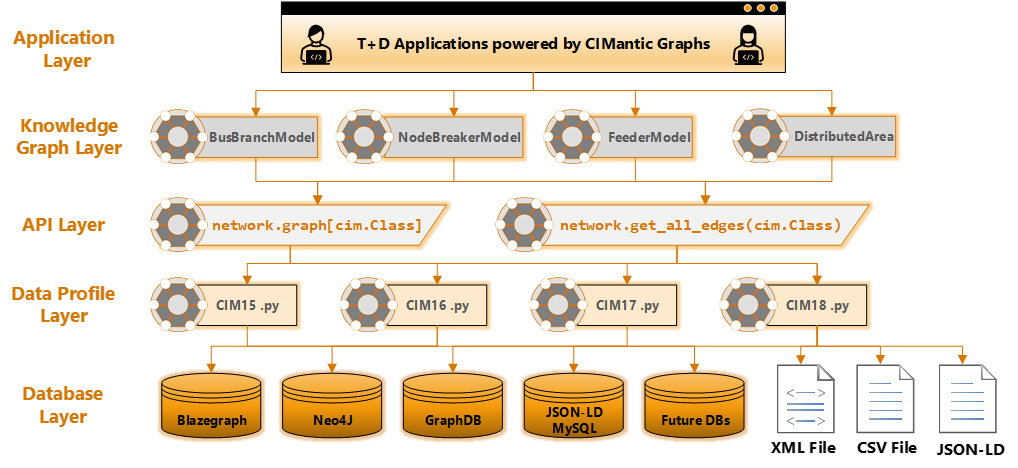
Database Layer
CIMantic Graphs currently supports the following databases and interfaces:
Blazegraph Database
GraphDB Database
Neo4J Database
MySQL Database (in progress)
GridAPPS-D Platform
AVEVA PI Asset Framework (in progress)
RDFLib File Parser
XML Flat Files
JSON-LD Flat Files (in progress)
CSV Flat Files (in progress)
The library uses a unified syntax for all upper-level calls and routines. The databases can be swapped interchangeably by changing the ConnectionParameters created during application startup and no other changes to any other application syntax or methods
Data Profile Layer
CIMantic Graphs is able to support any standard or custom CIM profile. The CIM profile needs to be exported as an XSD data profile / schema. CIMantic Graphs is then able to ingest the data profile and convert all UML classes and attributes to python dataclasses, which power all of the routines and unified API syntax
API Layer
CIMantic Graphs offers a breakthrough in terms of ease-of-use through a unified API with two core methods.
Access to labeled property graph objects:
network.graph[cim.ClassName]: This offers access to a catalog of CIM object instances stored in memory and sorted by class type and mRID forming the named property graph.
Universal database query method:
network.get_all_edges(cim.ClassName): This is a universal query method that gets all attributes and all objects one edge away from instances of the specified class. This method works for all CIM classes, CIM profiles, serialization formats, and supported databases.
Knowledge Graph Layer
CIMantic Graphs offers three core knowledge graph classes for handing various kinds of power system models:
BusBranchModel: Transmission bus-branch models commonly used for planning and power flow studiesNodeBreakerModel: Transmission node-breaker models commonly used inside energy management systemsFeederModel: Distribution feeder models with support for single-phase unbalanced networks used in North America.
Centralized or distributed representations of the power system network model can be used. Centralized models use a single labeled property graph for the network. Distributed models use nested DistributedArea class instances to represent the grouping of equipment inside a Substation, VoltageLevel, Bay, Feeder, and switch-delimited topological area inside a combined T+D model.
Application Layer
T+D applications are able to access all of the power system objects through knowledge graph, without any need to connect to the database or perform any custom i/o operations.
Importing CIMantic Graphs
CIMantic Graphs contains several modules within the core library:
data_profiles: This package contains full CIM profiles exported through CIMTool and provides direct access to CIM dataclasses, their attributes, and usage documentation.databases: This package contains database i/o connections and backend query handling for multiple databases (e.g. Blazegraph, GraphDB, Neo4J, MySQL, etc.).models: This package contains knowledge graph models for transmission node-breaker, transmission bus-branch, and distribution feeder models.queries: This package contains generic queries that are built at runtime for any CIM profile and CIM class.utils: This package contains shortcut methods for common routines, such as writing out new files.
Specifying Environment Variables
IMPORTANT: As of v0.3+, the ConnectionParameters class has been deprecated. Use the environment variables below to authenticate with the database.
The CIM-Graph library supports multiple databases. The environment variables specify how to read the CIM model:
Required environment variables:
CIMG_CIM_PROFILE: This specifies the specific version of CIM to be used, based on the available python data profiles loaded into the library
Optional environment variables:
If these values are not specified, they will default to the sample values listed in example.env
CIMG_NAMESPACE: CIM namespace, default is"http://iec.ch/TC57/CIM100#"CIMG_IEC61970-301: Serialization version. Versions 7(default) and below userdf:ID=. Version 8 usesrdf:about=urn:uuid:CIMG_URL: URL at which the database can be reached via TCP/IP or other connectionCIMG_HOST: Database host addressCIMG_PORT: Database host portCIMG_DATABASE: Database nameCIMG_USERNAME: Database usernameCIMG_PASSWORD: Database password
Note that not all parameters are required. Each database connection uses a subset of these arguments depending on the requirements of the database connection driver.
To user the GridAPPS-D platform connection, set the environment variables shown below in your script or in a .env file
[1]:
import os
os.environ['CIMG_CIM_PROFILE'] = 'cimhub_2023'
os.environ['CIMG_URL'] = 'http://localhost:8889/bigdata/namespace/kb/sparql'
os.environ['CIMG_DATABASE'] = 'powergridmodel'
os.environ['CIMG_HOST'] = 'localhost'
os.environ['CIMG_PORT'] = '61613'
os.environ['CIMG_USERNAME'] = 'system'
os.environ['CIMG_PASSWORD'] = 'manager'
os.environ['CIMG_NAMESPACE'] = 'http://iec.ch/TC57/CIM100#'
os.environ['CIMG_IEC61970_301'] = '8'
os.environ['CIMG_USE_UNITS'] = 'False'
IMPORTANT - CHANGES IN SERIALIZATION IN GRIDAPPSD V2025.01.0
For GridAPPS-D / Blazegraph tags v2025.01.0 and later, the following environment variables are required:
os.environ['CIMG_CIM_PROFILE'] = 'cimhub_2023'
os.environ['CIMG_IEC61970_301'] = '8'
For GridAPPS-D / Blazegraph tags between v2021.01.0 and v2024.09.0, the following environment variables are recommended:
os.environ['CIMG_CIM_PROFILE'] = 'rc4_2021'
os.environ['CIMG_IEC61970_301'] = '7'
These changes relate to a change in the export format in the OpenDSS cim100 command which changed serialization versions of mRIDs for rdf:id=_mrid to rdf:about=urn:uuid:mrid
The ConnectionParameters class has been deprecated and will now throw a warning when called.
[2]:
from cimgraph.databases import ConnectionParameters # DEPRECATED!
params = ConnectionParameters(url = "http://localhost:8889/bigdata/namespace/kb/sparql",
                              cim_profile='cimhub_2023', iec61970_301=8) # Blazegraph params
ConnectionParameters class is deprecated and will be deleted in a future release
Set environment variables for required authentication
Connecting to the Data Source
The next step is to connect to the database or file source that will be used for CIM model, such as XMLFile, BlazegraphConnection, or GridappsdConnection
[3]:
from cimgraph.databases.blazegraph import BlazegraphConnection
database = BlazegraphConnection()
Importing the CIM Profile
The first step in using CIMantic Graphs is to import the python data profile for desired CIM profile. The data profile provides the ability to invoke CIM classes directly based on their name.
Method 1: Directly import the desired CIM profile:
[4]:
import cimgraph.data_profile.cim17v40 as cim
Method 2: Use importlib:
[5]:
import importlib
cim_profile = 'cimhub_2023'
cim = importlib.import_module('cimgraph.data_profile.' + cim_profile)
Invoking CIM classes
After importing the data profile, it is possible to create an instance of a class or view the attributes of any class.
Example 1: Create a new breaker with a name. If an mRID string is not provided, a UUID is automatically created based on the name or a random seed. Attributes of the class can be assigned
[6]:
breaker = cim.Breaker(name = "breaker_01", open=True)
breaker.NormalOpen = False
breaker.pprint()
{
    "@id": "7e72cb38-275c-4369-9c3b-e8b5a42a8703",
    "@type": "Breaker",
    "name": "breaker_01",
    "open": "True",
    "NormalOpen": false
}
Example 2: Associate two CIM objects based on their associations
[7]:
substation = cim.Substation(name = "sub_1")
breaker.EquipmentContainer = substation
substation.Equipments.append(breaker)
breaker.pprint()
substation.pprint()
{
    "@id": "7e72cb38-275c-4369-9c3b-e8b5a42a8703",
    "@type": "Breaker",
    "name": "breaker_01",
    "EquipmentContainer": {
        "@id": "5d58b92a-5734-4ae7-8f3c-1357e662cf16",
        "@type": "Substation"
    },
    "open": "True",
    "NormalOpen": false
}
{
    "@id": "5d58b92a-5734-4ae7-8f3c-1357e662cf16",
    "@type": "Substation",
    "name": "sub_1",
    "Equipments": [
        {
            "@id": "7e72cb38-275c-4369-9c3b-e8b5a42a8703",
            "@type": "Breaker"
        }
    ]
}
Example 3: View documentation of the ACLineSegment class
[8]:
print(cim.ACLineSegment.__doc__)
    A wire or combination of wires, with consistent electrical characteristics,
    building a single electrical system, used to carry alternating current
    between points in the power system.
    For symmetrical, transposed 3ph lines, it is sufficient to use attributes
    of the line segment, which describe impedances and admittances for the
    entire length of the segment. Additionally impedances can be computed by
    using length and associated per length impedances.
    The BaseVoltage at the two ends of ACLineSegments in a Line shall have
    the same BaseVoltage.nominalVoltage. However, boundary lines may have slightly
    different BaseVoltage.nominalVoltages and variation is allowed. Larger
    voltage difference in general requires use of an equivalent branch.
Creating a Container and Graph Model
CIMantic Graphs uses an EquipmentContainer class as the starting point for building a knowledge graph of the power system model. The supported classes are BusBranchModel, NodeBreakerModel, and FeederModel.
[9]:
from cimgraph.models import FeederModel
The power system network is then created by passing the database connection, container object, and a boolean flag whether a centralized or distributed model should be built.
[10]:
feeder = database.get_object(mRID="49AD8E07-3BF9-A4E2-CB8F-C3722F837B62") #ieee 13 bus
network = FeederModel(connection=database, container=feeder, distributed=False)
The network is populated by default with all ConductingEquipment, ConnectivityNode, and Terminal class instances. The knowledge graph is indexed by the class type and then the device mRID.
To view all instances of a particular class, use the .pprint(cim.ClassName) method. The default python print method and individual .pprint() statements can also be used on network.graph and individual objects.
By default, only equipment classes and basic connectivity information (nodes and terminals) are loaded with just the UUIDs of each class to optimize memory usage.
[11]:
network.pprint(cim.Breaker) # View all instance data of type Breaker
[
    {
        "@id": "52de9189-20dc-4c73-bdee-e960fe1f9493",
        "@type": "Breaker",
        "Terminals": [
            {
                "@id": "1d81c7fe-e88f-41e3-a900-476ca6476ccd",
                "@type": "Terminal"
            },
            {
                "@id": "2847e06b-c8ed-41e6-b515-c61c9e8eb4b4",
                "@type": "Terminal"
            }
        ]
    }
]
CIM-Graph also supports object visualization using the Mermaid.js library via the cimgraph.utils module. Full documentation of visualization is available in the separate documentation via PyPi. The breaker that we just viewed can be visualized by passing the object to the utils.get_mermaid() method:
[12]:
from mermaid import Mermaid
from cimgraph import utils

breaker = list(network.graph[cim.Breaker].values())[0] #first breaker in graph

diagram_text = utils.get_mermaid(breaker)
Mermaid(diagram_text)
[12]:
Automated Database Queries
CIMantic Graphs contains automatic query generation routines for all classes and all supported databases using the .get_all_edges(cim.ClassName) method. This query obtains all attributes for all objects of that class type and expands the knowledge graph by one edge with default instances of all associated objects.
[13]:
network.get_all_edges(cim.Breaker)
network.get_all_edges(cim.Terminal)
network.get_all_edges(cim.ConnectivityNode)
No separate queries or mapping are required for measurment objects. Call the .get_all_edges method for each measurement class, and then obtain the measurements from the equipment object
[14]:
network.get_all_edges(cim.Analog)
network.get_all_edges(cim.Discrete)
[15]:
for meas in breaker.Measurements:
    p = meas.phases
    print("name:", meas.name, "  phase:" , meas.phases, "  bus:", meas.Terminal.ConnectivityNode.name)
name: Breaker_brkr1_A_1_C   phase: PhaseCode.C   bus: 650
name: Breaker_brkr1_A_1_A   phase: PhaseCode.A   bus: 650
name: Breaker_brkr1_A_1_B   phase: PhaseCode.B   bus: 650
name: Breaker_brkr1_Pos_1_A   phase: PhaseCode.A   bus: 650
name: Breaker_brkr1_Pos_1_B   phase: PhaseCode.B   bus: 650
name: Breaker_brkr1_Pos_1_C   phase: PhaseCode.C   bus: 650
We can visualize the impact of running the queries on the network graph by re-generating the visualization of the breaker object:
[16]:
diagram_text = utils.get_mermaid(breaker)
Mermaid(diagram_text)
[16]:
Traversing the Knowledge Graph
CIMantic Graphs associates CIM classes by creating direct references between in-memory object instances based on the naming and hierarchy of the underlying information model.
To view the attributes of particular object instance, directly invoke the attribute from the UML class diagram.
[17]:
from uuid import UUID
breaker = network.graph[cim.Breaker][UUID("52de9189-20dc-4c73-bdee-e960fe1f9493")]
print(breaker.normalOpen)
False
To traverse the knowledge graph, no custom queries are required. Instead, directly invoke the UML association names that serves as references between objects in the graph:
[18]:
bus1_name = breaker.Terminals[0].ConnectivityNode.name
bus2_name = breaker.Terminals[1].ConnectivityNode.name

print(breaker.name,'connects nodes',bus1_name,bus2_name)
brkr1 connects nodes 650 brkr
We can visualize the graph traversal path by passing in the traversal as a string to the utils.get_mermaid_path() method:
[19]:
diagram_text = utils.get_mermaid_path(breaker, 'Terminals[0].ConnectivityNode')
diagram_text = utils.add_mermaid_path(breaker, 'Terminals[1].ConnectivityNode', diagram_text)
Mermaid(diagram_text)
[19]:
Utils Shortcuts
CIM-Graph provides several shortcut methods using the utils library for file writing, simplified queries, diagram creation, and class visualization.
The utils module can be imported using
[20]:
from cimgraph import utils
Shortcuts for Bulk Queries
The utils module offers several shortcut methods for querying for all relevant classes involving lines, transformers, capacitors, or everything in the model. These methods are documented in Utils Get All Data. Due to the size of the queries (which are parsing tens of thousands of objects), completion can take a few seconds to a minute for large models.
For example, the method to get all line data (including phasing, asset info, lower triangulare impedances, etc.) is
[21]:
utils.get_all_line_data(network)
Shortcuts for File Writers
The utils module offers writers for XML, JSON-LD, and CSV formats for new and existing models. The arguments for the writers are the network GraphModel and filename / file directory:
[22]:
utils.write_json_ld(network, 'my_model.json')
Shortcuts for Visualization
CIM-Graph offers automatic diagram creation for classes, object instances, and graph traversal paths using mermaid.js. The diagrams are plain text (enabling git tracking) and can be rendered in markdown and most web tools. Full documentation on use of the utils module to create diagrams is provided in Mermaid Diagramming.
When running in a Jupyter notebook, the mermaid-python library can be used to display the generated diagrams and can be imported using
[23]:
from mermaid import Mermaid
As an example of the diagramming capabilities offered, an arbitrary UML diagram can be create by passing in a list of CIM classes to be displayed. The diagrams presented above were also auto-generated using the utils module.
[24]:
diagram_text = utils.get_mermaid([cim.ACLineSegment,
                          cim.ACLineSegmentPhase,
                          cim.PerLengthImpedance,
                          cim.PerLengthPhaseImpedance,
                          cim.PhaseImpedanceData,
                          cim.WireSpacingInfo])
Mermaid(diagram_text)
[24]: